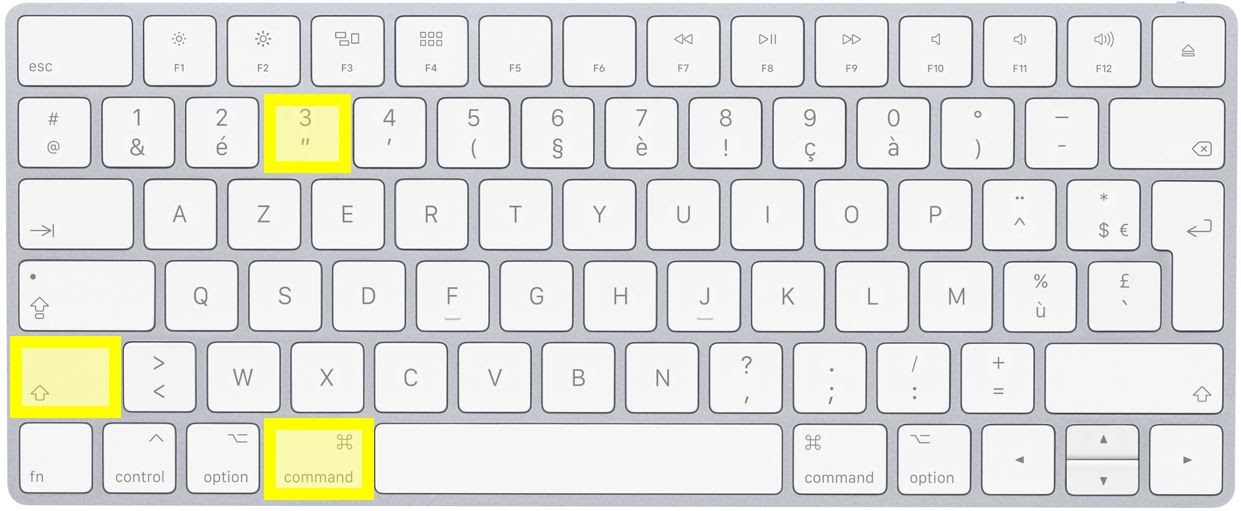
If you want to take a screenshot on Mac right now, right away, press these three keys at the same time: SHIFT, Command/⌘ and 3. That's it, your screenshot is available on your desktop !
How to Take a Screenshot on Mac my Methods
Three main methods coexist, depending on the complexity of your needs:
- Mac screenshot via key combination for very basic captures ,
- Capture Mac screen via the built-in “Screen Capture” utility for editable captures,
- Mac screen capture via dedicated software for ultra-precise and editable captures: Snagit.
Also note that depending on your Mac version, some methods may differ slightly. Indeed, the integrated utility is a new feature that appeared with Mojave (10.14). The capture method via the key combination works for all versions.
Take Mac screenshots quickly with Snagit
Discover Snagit, the essential tool for taking Mac screenshots and editing them easily and quickly. With Snagit, everything is easy!
Method 1 – Capture your Mac screen with the key combination: the easiest
You can get a screenshot by pressing multiple keys on your keyboard at the same time. The “Shift” key is represented by an arrow pointing towards the top of the keyboard: ⇧ .
After each capture, a preview of the image will be displayed superimposed in a corner of your screen for a few seconds. You can click on it to access the editing tool (or do nothing and the capture will automatically save to the desktop).
How to take a Mac screenshot of the entire screen?
- Hold down simultaneously: Shift/ ⇧ , Command/⌘ and 3 ,
- The capture automatically appears on your desktop.

How do I capture part of my screen?
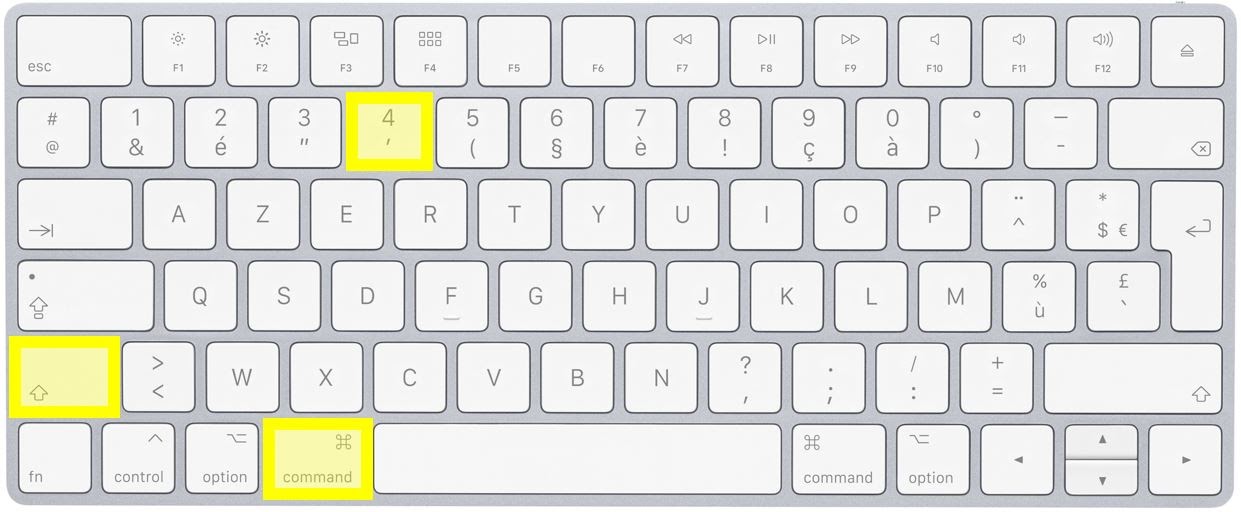
- Hold down simultaneously: Shift/ ⇧ , Command/⌘ and 4 ,
- The mouse cursor becomes a cross pointer,
- Left click while remaining pressed, then draw the selection of your choice,
- When you see the desired selection appear, release your finger from the left button,
- The capture automatically appears on your desktop.

How to take a Mac screenshot of a particular window?
- Open the window you want to capture,
- Hold down simultaneously: Shift/ ⇧ , Command/⌘ and 4 ,
- The mouse cursor becomes a camera pointer,
- Click on the window to capture,
- The window turns a bright color to verify your choice,
- Press the space bar,
- The capture is automatically displayed on your desktop,
- To stop your capture and return to the normal cursor, press Esc.
Method 2 – Take a screenshot with the built-in tool on Mac: to capture and edit
It's not always easy to remember keyboard shortcuts if you don't take screenshots often. Fortunately, you can access a small dedicated utility, installed by default on Mac to capture your screen.
In addition to being able to make the same captures as described in the key combination method, the built-in tool also gives you the following options:
- Screen capture in video format,
- Editing the capture,
- Setting up a timer,
- Etc.
You can also choose the destination for automatic saving of the capture. This will be saved on your computer's desktop by default.
How do I access Mac's built-in screenshot tool?
- Hold down Shift/ ⇧ , Command/⌘, and 5 simultaneously .
OR
- Follow the path Go > Utilities > “ Screenshot ”.
The small utility appears at the bottom of your screen in the form of a bar.

Then follow these 3 steps to capture your screen:
- Click on the capture mode of your choice,
- Take your capture using your mouse cursor. The behavior of the cursor will be the same as in the key combination method,
- The capture automatically displays on your desktop or in the location of your choice.
Take Mac screenshots quickly with Snagit
Discover Snagit, the essential tool for taking Mac screenshots and editing them easily and quickly. With Snagit, everything is easy!
Method 3 – Take a Mac Screenshot with Snagit: The Most Professional

Snagit is software dedicated to photo or video screen capture. It offers great capture precision since it is equipped with a reticle (targeting cursor for pixel-perfect surgical precision).
It lets you record your screen, but it also provides sophisticated editing and customization options:
- Advanced image edits,
- Replacing text in an image,
- Creation of animated GIFs,
- Video capture,
- Effects,
- Annotations,
- Sharing,
- Etc.
Lightweight and easy to use, don't hesitate to download the free trial version of Snagit to take your Mac screenshots further.
How to take a Mac screenshot with Snagit?
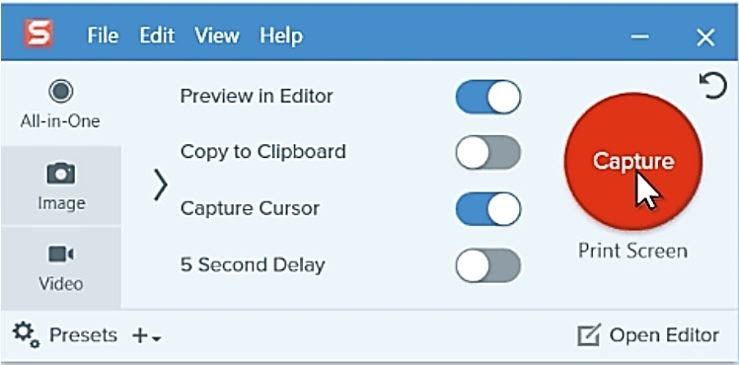
- Open the Snagit software,
- Click on the “Capture” button,
- Click on “Image” for a simple capture or on “All-In-One” to access modes with options: still image, video or panoramic scrolling,
- Using the cross-shaped cursor, select the part of your screen to capture.

Once your capture is made, Snagit will reveal its biggest advantage to you: its numerous possibilities for modifying your capture.
Whether you need to blur your image to hide sensitive data, edit it to highlight information to create a quality SOP for your collaborators, or even extract the text from your capture to replace it with another , all this is not only possible but also very easy to do!
Pour des captures encore plus millimétrées, Snagit vous permet également d’enregistrer votre écran et de créer une courte vidéo. Et si jamais vous avez besoin d’un logiciel plus complet pour enregistrer votre écran, TechSmith a pensé à vous avec le logiciel Camtasia. Il s’agit d’un logiciel d’enregistrement d’écran et de montage vidéo professionnel.
Faites des captures d’écran Mac rapidement avec Snagit
Découvrez Snagit, l’outil indispensable pour faire des captures d’écran Mac et les éditer facilement et rapidement. Avec Snagit, tout est facile !
Capture d’écran sur Mac : questions fréquentes
Pour capturer la totalité de votre écran, appuyez en même temps sur Maj, Commande et 3.
Les captures d’écran réalisées à partir d’une combinaison de touches sont automatiquement enregistrées sur le bureau sous le nom « capture d’écran + date + heure.png ».
Snagit vous permet de faire des captures d’écran professionnelles et de les éditer facilement et rapidement. En entreprise, Snagit devient très vite l’outil indispensable pour gagner du temps et être plus efficace.


